Step-by-Step Guide: How to Use a Nail Drill Effectively
The nail drill device enhances both manicure and pedicure operations by allowing both accuracy and efficiency in your nail work. The wrong application of a nail drill device may cause harm to your nails. This guide establishes an in-depth breakdown of nail drill applications that ensure security while achieving maximum outcome results.

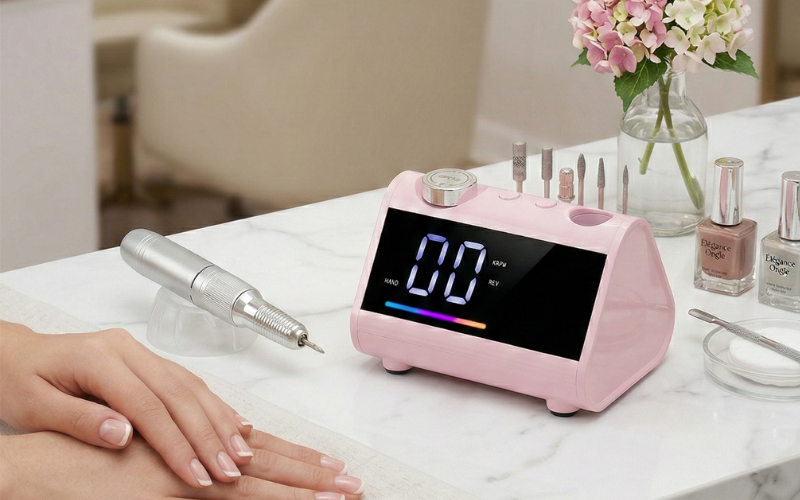
Understanding the Nail Drill
The electric nail file called a nail drill operates as a tool that provides exact shaping abilities while smoothing and cleaning nails. A nail drill function with two parts namely the handpiece joined with replaceable tool bits which have adjustable rotation speeds. Learning about the nail drill structure, along with its operational features, becomes essential before starting any nail treatment application.
Selecting the Appropriate Nail Drill
To perform nail care properly and safely, you should select a suitable drill tool. The selection should include an examination of speed configurations and an evaluation of handpiece ergonomics together with vibration-dampening features. Either beginners or professionals should choose a nail drill with multiple speed settings that produce minimum vibration. The nail drill must have a lightweight frame with ergonomic features so users can work without hand tiredness during extended periods.
Choosing the Correct Drill Bits
Drill bits exist in multiple forms with different dimensions and compositions that deliver particular functions. Sanding bands serve to smooth surfaces while carbide bits remove gel and acrylic material, and diamond bits are needed for cuticle work. The selection of suitable drill bits based on the current operation maintains high work efficiency and guards against nail deterioration.
Preparing Your Workspace and Nails
You must prepare a sterile and bright working area before operating a nail drill. The required tools should be sanitized, and your hands should be washed completely. Start by removing all nail polish from your fingers and cutting your nail lengths to the preferred size. A cuticle pusher allows safe access to drilling zones by carefully ganging back the cuticles.
Setting the Drill Speed
The drill speed needs adjustment based on the work you perform. Drilling natural nails and cuticles requires low speeds yet removing gel or acrylic works better with higher speeds. Operating the drill at low speed permits users to adapt to its functions while minimizing the chances of excessive filing.
Holding the Drill Properly
Position the drill like you hold a pencil and maintain a steady and comfortable hold when operating it. Place your supporting hand on a level surface for steady control during the operation. A steady position of your wrist helps prevent accidental slips that could lead to injuries.
Filing and Shaping the Nails
Placing the drill bit gently on the nail surface should be done in a single direction as part of the initial drilling process. The process requires delicate application of pressure, and you should not keep the drill at any single spot for an extended time. During shaping, work along the natural nail curvature by adjusting the drill angle according to the desired nail shape.
Working on the Cuticles
The drill bit calibration should be changed to a softer tip when working with the fingernail cuticles. Begin by carefully eliminating access cuticles and dead skin while showing caution against hard pressure. Correct techniques in this area shield the nails from damage and encourage proper nail growth.
Smoothing and Buffing
The nail surface becomes smooth after cuticle work and shaping when using a buffer bit. The process smooths out all imperfections throughout the nail surface, which ultimately prepares the nail for subsequent treatments and decoration. The nail surface must be smoothed using equal force and a steady pattern of movement.
Cleaning and Maintaining the Drill
It is essential to maintain your nail drill after every use because this will lead to its long-term survival. Clean the bits with a disinfectant solution before placing them for thorough drying before storage. You should wipe the handpiece with a clean cloth until all dust particles and debris are removed. Drill maintenance provides both safe working conditions and efficient performance of the device.
Safety Precautions
Use protective eyewear combined with a dust mask to stop the inhalation of nail dust and defend your eyes from debris. Cover your hair and choose fitting clothes to prevent accidents while operating the drilling instrument. Store the drill device in a dry, safe area that is separate from water sources until its use ends.
Troubleshooting Common Issues
You must pause operation when the drill reaches high temperatures until it reaches the proper operating temperature. High heat during operation signals possible overworking or a need for equipment maintenance. The drill makes unexpected audios together with vibrations, which point to loose attachment or internal damage; check the position of the bit. also, review the manufacturer's instructions if you encounter persistent problems.
Enhancing Your Nail Care Routine
Such tools enhance both the quality of manicures and pedicures that you perform. Commit to daily practice for better refinement of skills while starting from basic procedures and advancing toward more complicated operations. Following continuous learning and strict safety guideline adherence will bring optimal outcomes.

Conclusion
Learning to operate a nail drill successfully involves grasping its different parts while choosing suitable tool attachments with proper application techniques. This complete guide provides step-by-step instructions to allow you home achievement of professional-quality nail care. The website www.zsbeauty.com provides top-quality nail drill tools alongside specialty accessories that aim to improve your at-home nail treatment procedures.
FAQs
1. New users who operate a nail drill require which rotational velocity to achieve optimal results.
New users need to use the lowest speed range from 5,000 to 10,000 RPM to gain control of the drill without harming their nails.
2. When is the correct time for replacing my nail drill bits?
The operation of a nail drill becomes unsafe when drill bits exhibit signs of wear, so always replace them before continuing use.
3. Does this drill operation function effectively between natural nails and artificial nails?
Different drill bits must be selected for artificial and natural nails since they need specific bits to ensure safety.